Here is another writeup for PicoCTF, if you don’t know this wonderful platform, you can start from our Registration Guide!
Dive into the exciting world of Capture The Flag (CTF) challenges with the PicoCTF puzzle “Hurry up! Wait!”. This unique challenge asks you to find a hidden flag in a file. But there’s a twist – the file, named svchost.exe, is actually an ELF file.
At first, this challenge may seem tough. But don’t worry, we have Ghidra, a powerful open-source reverse engineering tool. With Ghidra, we can use scripts to simplify the process and find the solution.
In this article, we’ll do more than just solve a puzzle. We’ll also learn about cybersecurity, improve our problem-solving skills, and enjoy the thrill of success. So whether you’re an aspiring ethical hacker, a cybersecurity hobbyist, or just someone who loves solving digital mysteries, this guide is for you.
I suggest you read this walkthrough only if you are not a beginner on picoCTF, in case you don’t know the platform, I wrote a complete tutorial here.
So, get ready for a thrilling ride into the PicoCTF “Hurry up! Wait!” challenge.
Understanding the Challenge
Let’s dive into PicoCTF’s “Hurry up! Wait!” challenge. It puts a unique spin on things by serving an ELF (Executable and Linkable Format) file disguised as svchost.exe, a usual Windows system process.
ELF files and .exe are very different. ELF is a common binary format for Unix and similar systems, while svchost.exe is integral to Windows. But in this challenge, the ELF file is renamed svchost.exe, adding a twist to our task.
Our goal is to unearth the flag hidden within this ELF file. While it may seem daunting, it’s far from impossible. With Ghidra’s powerful scripting tools and a basic understanding of CTFs, we’re more than ready to tackle this challenge.
While there are many manual solutions available online, our approach is a bit different. We’ll leverage Ghidra scripting to automate the process using Python. This method is not only efficient but also a great learning experience.
Before we start, you should know basic Python and reverse engineering (you can read this article to improve a bit your knowledge). You should also be willing to explore documentation as needed. With these prerequisites checked, let’s dive into the “Hurry up! Wait!” challenge!
Introduction to Ghidra
Now, let’s introduce Ghidra, the key tool for our “Hurry up! Wait!” PicoCTF challenge. Ghidra is an open-source reverse engineering toolkit developed by the National Security Agency’s Research Directorate. It’s used widely to analyze malicious code and identify potential network vulnerabilities.
It offers various features, such as disassembly, assembly, decompilation, graphing, and most importantly for us, scripting. Scripting in Ghidra allows us to automate the analysis, saving valuable time and ensuring more accurate results. For this task, we’ll be scripting using Python, which is known for its simplicity and effectiveness.
With Ghidra and Python at our disposal, we’re well-equipped to tackle the “Hurry up! Wait!” challenge head-on. Let’s dive deeper into the process!
Before we jump into solving the PicoCTF “Hurry up! Wait!” challenge, we need to set up Ghidra on our system. Since we’re using Kali Linux, a favorite choice for ethical hacking, the process is straightforward with its robust package manager.
You have two installation options:
- Quick Installation: Ghidra is available in Kali’s repository, making installation as simple as typing the following command in the terminal:
sudo apt install ghidra
That’s it. Ghidra is installed on your system! - Manual Installation: Click here to navigate to Ghidra’s website and download the source or executable files. Once downloaded, follow the instructions provided on their page.

If you’re using Windows, you can only install Ghidra from their website. However, I recommend using a Linux virtual machine for this tutorial.
In this guide, I’ll go with the quick installation since it’s efficient and uncomplicated.
Next, we’ll import the ELF file (disguised as svchost.exe) into Ghidra:
Open Ghidra from your application menu in the “Reverse Engineering” section.

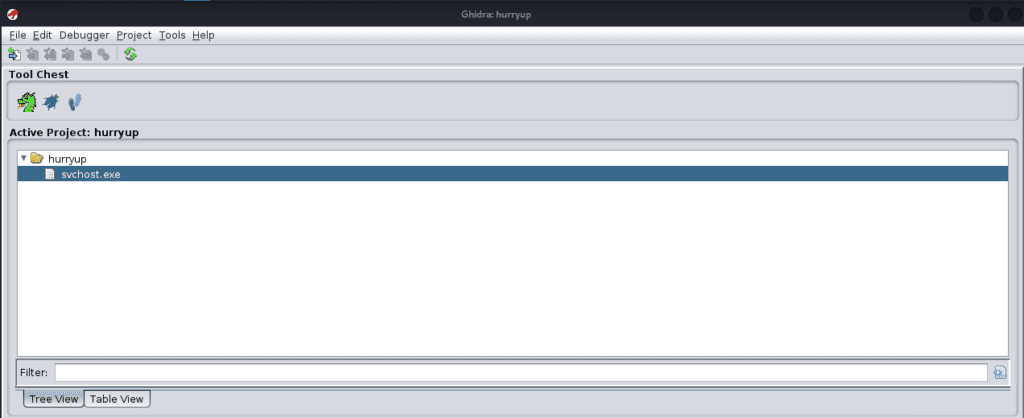
In the Ghidra project window, create a new project, and you can drag and drop the svchost.exe file.

Ghidra will ask if you want to analyze the file. Agree to this for Ghidra to carry out an initial analysis, which sets the stage for our scripting efforts.

Now you should have a view where you can check the functions one by one, and at a quick glance, there is one that seems to be more interesting than the others.
void FUN_0010298a(void)

{
  ada__calendar__delays__delay_for(1000000000000000);
  FUN_00102616();
  FUN_001024aa();
  FUN_00102372();
  FUN_001025e2();
  FUN_00102852();
  FUN_00102886();
  FUN_001028ba();
  FUN_00102922();
  FUN_001023a6();
  FUN_00102136();
  FUN_00102206();
  FUN_0010230a();
  FUN_00102206();
  FUN_0010257a();
  FUN_001028ee();
  FUN_0010240e();
  FUN_001026e6();
  FUN_00102782();
  FUN_001028ee();
  FUN_001023da();
  FUN_0010230a();
  FUN_0010233e();
  FUN_0010226e();
  FUN_001022a2();
  FUN_001023da();
  FUN_001021d2();
  FUN_00102956();
  return;
}
Open them randomly we can see that they are always the same call with different parameters, for example:
void FUN_00102616(void)

{
  ada__text_io__put__4(&DAT_00102cd8,&DAT_00102cb8);
  return;
}
Looking at the assembly we can also see that the first instruction after setting up the stack pointer is moving a value into EAX

And by Iterating every function from FUN_00102616() to FUN_00102956() you can understand that they are printing the flag!
You should also notice that the LEA instruction we are interested in is 9 bytes offset from the function entry point! Said that we can start scripting!
Unleashing Ghidra Scripting
Now that we have our environment all setup, we’re ready to unleash the power of Ghidra scripting. Ghidra supports a variety of scripting languages, but for our quest, we’ll be using Python. Python’s simple syntax and rich library ecosystem make it an excellent choice for scripting tasks. In Ghidra, we can create, edit, and run scripts using the Script Manager, accessible via ‘Window’ -> ‘Script Manager’. Then create a new script and open it with the editor!
To tackle the “Hurry up! Wait!” challenge, we’ll be writing a script that iterates over the instructions in the ELF file, identifies function calls to functions starting with “FUN_00”, and extracts the flag from these function calls. This process might sound complex, but by breaking it down step-by-step, it’s manageable and even fun!
Walking Through the Script
Now, it’s time to deep dive into our Python script. We’ll break down every part of the process: establishing our main function, moving through instructions, pinpointing particular function calls, and ultimately uncovering and displaying the flag. We’ll explore each step in detail. This hands-on journey will not only crack the PicoCTF “Hurry up! Wait!” challenge but also shed light on Ghidra’s scripting prowess and Python scripting in general. So, let’s get our hands dirty with some coding! Before we proceed, let’s take a glance at the full script.
from ghidra.program.model.listing import Function
from ghidra.program.model.scalar import Scalar

def get_called_functions(func):
    # Iterate over instructions, yield addresses of calls to functions starting with "FUN_00"
    for instr in currentProgram.getListing().getInstructions(func.getBody(), True):
        if instr.getFlowType().isCall():
            for ref in instr.getReferencesFrom():
                called_func = getFunctionAt(ref.getToAddress())
                if called_func and called_func.getName().startswith("FUN_00"):
                    yield called_func.getEntryPoint()

def get_flag_char(address):
    # Given an address, get instruction at offset 0x9, convert operand to address,
    # then retrieve and return byte at this address as character
    target_address = address.add(0x9)
    instruction = currentProgram.getListing().getInstructionAt(target_address)
    operand = instruction.getOpObjects(1)[0]
    if isinstance(operand, Scalar):
        char_addr = toAddr(operand.getValue())
        return chr(currentProgram.getMemory().getByte(char_addr))
    return None

# Get the main function
main_function = getFunctionAt(toAddr(0x0010298a)) # Entry point of main function visible from disassembler

# Use list comprehension to generate list of flag characters
flag = [get_flag_char(addr) for addr in get_called_functions(main_function) if get_flag_char(addr) is not None]

# Print flag
print(''.join(flag))
Demystifying the Script
Let’s break this script down into its components:
- Import Necessary Libraries: This script starts by importing the required libraries: Function from the ghidra.program.model.listing and Scalar from
ghidra.program.model.scalar. These libraries provide the necessary tools for interacting with functions in the Ghidra tool and for handling scalar (single) values, respectively. - Define Function to Get Called Functions: The
get_called_functions(func)function iterates over the instructions within a given function. It yields the addresses of calls to functions that start with “FUN_00”. This means it generates a sequence of these addresses, which we can iterate over later. - Define Function to Get Flag Character: The
get_flag_char(address)function takes an address as input. It then finds the instruction at an offset of 0x9 from that address. It extracts the operand from the instruction, converts it to an address, and then retrieves the byte at this address as a character. If the operand is an instance of Scalar (a type of numerical representation in Ghidra), it proceeds with the above steps. Otherwise, it returns None, indicating that it was unable to retrieve a flag character from the given address. - Get the Main Function: Here, the script retrieves the main function from a specific address (0x0010298a in this case). This function presumably contains the instructions that the script needs to analyze to find the flag.
- Generate List of Flag Characters: In this part, the script uses a Python construct called list comprehension. It iterates over the addresses yielded by the get_called_functions(main_function) call. For each address, it attempts to retrieve a flag character using the
get_flag_char(addr)function. If theget_flag_char(addr)function returns a character (not None), it adds this character to the list. If the function returns None, it doesn’t add anything. - Print the Flag: Finally, the script joins all the characters in the list into a single string, effectively reconstructing the flag, and prints this flag to the console.
So, in simple terms, this script analyzes a particular function in the binary, extracts specific instructions from that function, retrieves data from those instructions, and uses that data to reconstruct and print a flag. Let’s run it and see the result!
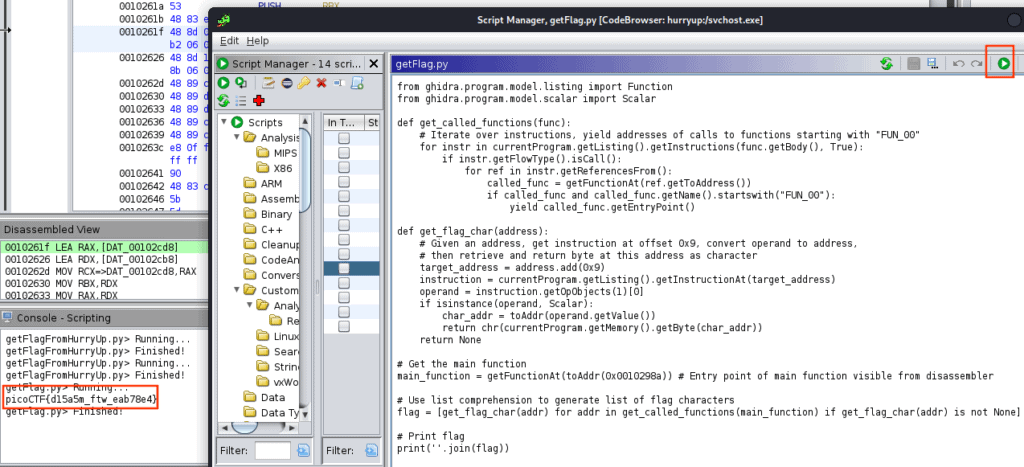
Finally, you can execute it and see the result

And our flag is:
picoCTF{d15a5m_ftw_eab78e4}
We can put it into the picoCTF input and complete the challenge!
Conclusion
Our dive into PicoCTF’s “Hurry up! Wait!” challenge has been an enlightening trip. We’ve explored the depths of cybersecurity puzzles, guided by the powerful light of Ghidra scripting.
Mastering Ghidra scripting is a skill that opens doors in many corners of the cybersecurity world. Solving challenges like this one brings a feeling of triumph that motivates us to sharpen our abilities further.
As we wrap up, we hope you use this experience as a springboard to dive into more complex challenges. Remember, every puzzle solved is a step closer to becoming a cybersecurity whiz. So, keep learning, keep practicing, and soon enough, you’ll be scripting your way through even the toughest challenges!
Don’t forget to keep an eye on our blog for more guides and write-ups like this one. Also, make sure to follow our social profiles to stay updated on our latest posts. The world of cybersecurity is vast and exciting, and we’re here to explore it together. Happy hacking!


